Wednesday 15 January 2014

Caching


First of all what is cache?

Cache is a component that can store data so that future requests can be served faster. Now this data can be of anytype , it can be some records
or even the web-pages can be stored , so that we can access them easily later-on from that location , without fetching it again from the main server.
So one advantage of caching is clear , that it does not create load on the main server.


Why to use cache ?

Cache improves the performance of our application by reducing the time required to bind our web page. As we all know , web-applications are accessed by multiple-users.
Multiple users , that means heavy load on the servers. Now think of the time , when millions of users are accessing the site at the same time.
One server is there to respond to all the web-requests. What will happen then ??

Obviously , our server will slow down and thus our website . Guys , these days , if anybody wants to do business online , or say if business of a
person is totally dependent on website and that website is responding very slow , you can think what will be the profit of that person . The very correct answer is 0(zero), because these days , there is a huge competetion in market. And no customer want to search data in a slow website.


So what to do ?

The answer is , optimize your web-application . We can easily have optimization by using some advanced techniques like caching , by the use of load-balancers etc.
In  this post , I will be talking about Caching .

Types of caching :

Caching can be categorized into different types according to the location where we have cached our data. We can cache our data either on the client side (in our browser) and even on our server , or in between client and browser.

Different types of Caching are :

a) Client Caching
b) Server Caching
c) Proxy Caching
d) Reverse - Proxy Caching

All such types will be discussed in our upcoming posts . Till then ,

Happy Coding!

Friday 20 December 2013

Add Rule and Insert Rule methods Css stylesheet

Add Rule and Insert Rule methods :


 Sometimes we need to change our css rules dynamically. With Css-rules ,I mean to say style-definition of css classes and ids.
 We can add new rules to our predefined class using the insertRule and addRule (as reqd.) methods to add new rules to our css class 
 as is shown below:

 The addRule method accepts three arguments:  the selector, the second the CSS code for the rule, and the third is the zero-based integer 
 index representing the style position (in relation to styles of the same selector):

 sheet.addRule("#myId", "float: left; background: red !important;", 1);


 The CSSStyleSheet.insertRule() method inserts a new style rule into the current style sheet.

sheet.insertRule("#myId", "float: left; background: red !important;", 1);


function addCSSRule(sheet, selector, rules) {
if(sheet.insertRule) {
sheet.insertRule(selector + "{" + rules + "}", index);
}
else {
sheet.addRule(selector, rules, index);
}
//if -else is used because some browsers don't support insertRule and some don't support addRule
}
// we can use it as
addCSSRule(document.styleSheets[0], "header", "float: left");

Happy Coding!

Tuesday 17 December 2013

Use of delegates to improve the performance of application

Delegates:

Definintion:

Delegate is a type which  holds the method(s) reference in an object. It is also referred to as a type safe function pointer.

Using delegates basically includes three stages:

1) Defining Delegate.
2) Declaring Delegate.
3) Method Definition.

These stages are elaborated as follows:

1) Defining Delegate:

public delegate double AddNumbers(double num1, double num2);
While defining delegate, we are supposed to provide the parameters and the datatype of the delegate. In our example , the delegate has two parameters num1 and num2 which are of double type . And also the return type of our delegate is double.

2) Declaring Delegate:

Now after defining delegate, we need to declare our delegate .
public AddNumbers objAdd = null;
I have created this object of our delegate and instantiated it to null. So that I can use it anytime in my code file without declaring it again and again.

3) Method Definition:

Now the final thing that we need to do is to create the method that is going to be referenced by our delegate.

So here is our method :

public double AddMyValues(double val1, double val2)
{
    return val1+val2;
} 

Now, how we are going to integrate all these , is described below:

public delegate double Delegate_Add(double a,double b);
 class MainClass
 {
    static double AddMyValues(double val1, double val2)
    {
        return val1+val2;
    } 
    static void Main(string[] args){
    //Creating the Delegate Instance
    Delegate_Add delObj = new Delegate_Add(AddMyValues);
    Console.Write("Please Enter Values");
    double v1 = convert.toDouble(Console.ReadLine());
    double v2 = convert.toDouble(Console.ReadLine());
    double result = delObj(v1,v2); 
    Console.WriteLine ("Sum of two numbers is :"+result);
    Console.ReadLine(); 
  }
}
Advantages of using delegates :
1)Encapsulating the method's call.
2)Use of delegates improve the performance of application.
3)Used to call a method asynchronously.
Thus , by using delegates we can increase perfomance of our application.


Happy Coding!

Wednesday 30 October 2013

Properties in asp.net and their uses

Properties and their uses 

Properties get and set values. The C# language provides them as a convenient way to simplify syntax. They are implemented as methods .They act as the standard way of conversation with the class. We should always work by implementing properties. Because this also increases encapsulation.

Encapsulate means to hide. Encapsulation is also called data hiding.We can think Encapsulation like a capsule (medicine tablet) which hides medicine inside it. Encapsulation is wrapping, just hiding properties and methods. Encapsulation is used for hide the code and data in a single unit to protect the data from outside world .Properties are the best method to encapsulate our data . With properties , our user of the class will be interacting with our class by means of our properties only.

These are different from fields(variables) as these will not require any memory to store data but these will point to the variable values .


Given below is an example to demonstrate the use of properties :

using System;
class MyClass
{
    int _myProperty;
    public int VariableValue
    {
       get
       {
         return this._myProperty;
       }
       set
       {
         this._myProperty= value;
       }
    }
}

class MainClass
{
    static void Main()
    {
      MyClass obj = new MyClass();
      obj.VariableValue = 1000; // setting the property value
      Console.WriteLine(obj.VariableValue); 
        // getting the property value 
    }
}
Result  : 1000
Properties can be of other data types also . For example : Boolean, string etc. 
Run the  code and enjoy object oriented programming by using properties .

Happy Coding!

Thursday 24 October 2013

Concept of User Controls In ASP.NET

Usercontrols In ASP.NET

A usercontrol is a reusable part of page. If we want to use a particular section on different pages of website , we use the usercontrols. User-Controls increases the re-usability of the same code. A simplest example of usercontrol is Login-functionality provided by websites or it could be simply a Left Panel appearing on a website.

Simply , we need to write the code in a separate user-control file and then we can easily use that on any page we want by simply registering the user control on that page. A big advantage of the UserControl is that it can be cached, using the OutputCache functionality. We will learn in the upcoming tutorials ,how we can store our data in cache.
We can cache our complete page or even a user-control.

To create a user control , right click on the project and select Add New Item and then choose web user control from the list of possible things to add. You should now have a MyLeftPanel ascx and a MyLeftPanel ascx.cs in your project. The first is where we put our markup, and the second is our CodeBehind file. Now, if MyLeftPanel ascx is not already open and selected, do so now. You will see only one line of code, the UserControl declaration. As mentioned, this control will be displaying information about a user, so let's get started adding some markup to do so.

For example , if we have to display some data in our left panel , we will use this user control as 

<%@ Control Language="C#" AutoEventWireup="true" Codebehind="MyLeftPanel.ascx.cs" Inherits="MyWeb.UserControls.LeftPanel" EnableViewState="false" %>

<div id="userName"><%=userName%></div> //links that we want in our left panel
<div id="userCity"><%=userCity%></div>
    
<script language="javascript" type="text/javascript">
var userName = '<%=userName%>';
 function jsFunction() {
 alert(userName);
 }
</script>      


I have written a javascript function here to elaborate that we can also use javascript and jquery functions in our user control .

On ascx.cs file we can use these as properties 

protected string userName;
protected string userCity;

userName = MyClass.userName;

Now how to use this user control in our project,
Pick a page in project, or simply create a new one for the purpose, and open it. The first thing we have to do, is declare our UserControl. It can be done either in each page where it's used, or globally in the web.config file. 
There is no performance difference , but when declaring UserControls in the web.config file, the controls have to reside in a different directory than the page(s) using it. 

For now, let's just declare it within the page. Add the following line below the standard page declaration:

<%@ Register TagPrefix="My" TagName="MyLeftPanel" Src="~/MyLeftPanel.ascx" %>


Make sure that the src value matches the path to our UserControl file. Now we can use the UserControl in your page, like any other control. For instance, like this:

<My:MyLeftPanel runat="server" ID="MyLeftPanelControl" />

Now this user control will get rendered with page load. Enjoy.

Happy Coding!


Tuesday 22 October 2013

Concept of Server.Transfer and Response.Redirect and their differences


Concept of Server.Transfer and Response.Redirect


Basically both of these are used when we want to make switch between two pages.


1) Server.Transfer : 

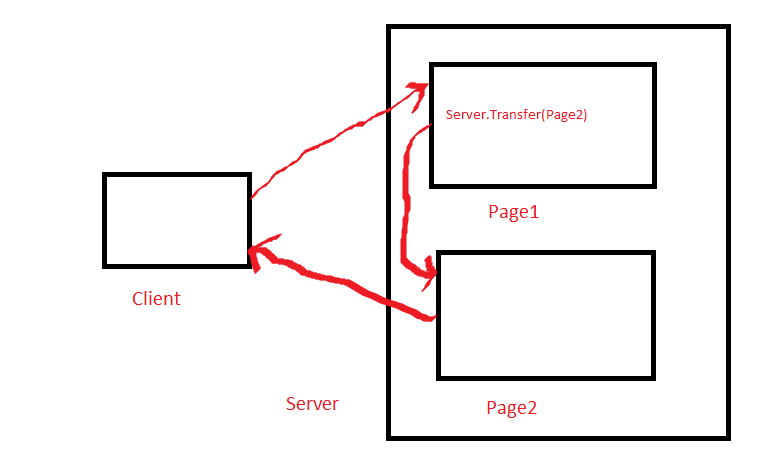
This method is used to transfer user from one page to other page without generating a new HTTP request . Thus this will lead to lesser roundtrip time (RoundTrip time is the time for the request sent and response received), because in this case user is moved to the next page at server side rather than making request first at client side and sending this request again to server to get the new page as is done in case of Reponse.Redirect .


                          Working of Server.transer is demonstrated in the diagram above


2) Response.Redirect :

 Response.redirect sends HTTP code 302 down to the users browser along with the url location of the requested page . HTTP code 302 actually means 'The requested resource resides under a different URI' . Thus simply , it can be said that Reponse.Redirect initiates another request to the server , but this is not the case with Server.Transfer because in that case , the original request is simply rewritten and is transferred to some other page on the server.


               Working of Response.Redirect is demonstrated in the diagram above


Differences among the both :


    Response.Redirect should be used when:
   
    we need to redirect the request to some other web server.
    we don't care about causing additional roundtrips to the server on each request.
    we do not need to preserve Query String and Form Variables from the original request.
    we need our users to be able to see the new redirected URL where he is redirected in  his browser.
   
    Server.Transfer should be used when:
   
    we need to transfer current page request to another page on the same server.
    we need to preserve server resources and avoid the unnecessary roundtrips to the server.
    we need to preserve Query String and Form Variables (optionally).
    we don't need to show the real URL where we redirected the request in the users Web Browser.


Happy Coding!

Monday 30 September 2013

Inline and Code behind technique and their differences

Inline and Code behind Technique 

Hello friends , many a times we came across two techniques of coding . These are :
1) Inline Technique.
2) Code-behind Technique.

 Classic ASP uses Inline coding technique as is used in case of php , and now a days in case of Razor(MVC).

First of all , let us discuss each technique individually and how we can implement our logic using these techniques and then I will discuss the differences among the both.

Inline Technique 

As the name indicates , Inline technique places the code on the page itself . That is , it allows the code to be written along with the HTML using the <script></script> tag.

For using inline-coding technique in our ASP.net page , we need to follow the steps written below :

 Step 1:  

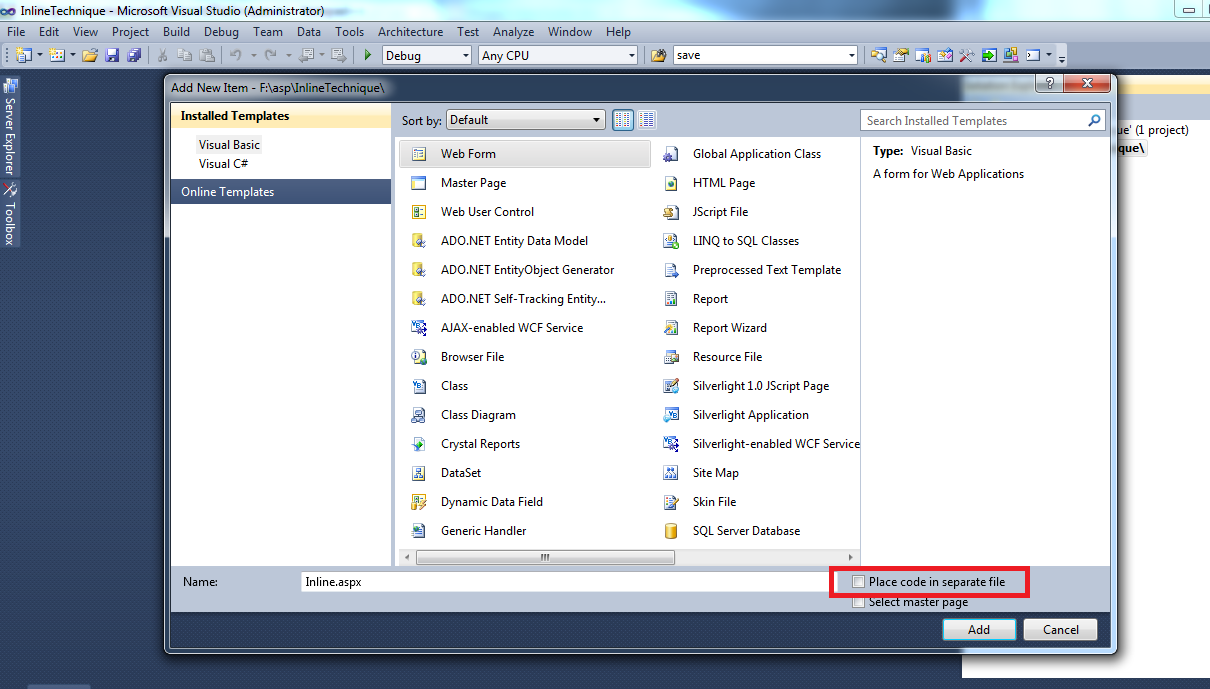
Create a blank website and then choose Add New Item and then choose web form and uncheck the checkbox  Place Code in Separate File  as shown below.
I am using c# as the development language .


 Step 2:  

In this example , I will use a text box and a button , and on click of Submit button Current date time would be displayed in the text box.
For inline technique , the code would be written inside the <script></script> tags as shown in the screenshot below.


Code Behind Technique

In this technique , code for an ASP.net web page is written in a separate class file from which our page inherits.

For using code-behind technique , follow these simple steps :

Step 1:

Create a blank website and then choose Add New Item and then choose web form as shown in screenshot above but this time the checkbox  Place Code in Separate File  should be checked.

Step 2:
 
Similarly I have taken a text box and a button again. Now when I press F7 or double click the submit button , code page will get opened having extension .aspx.cs . Write the code there as shown in the screenshot.

Now run the code .

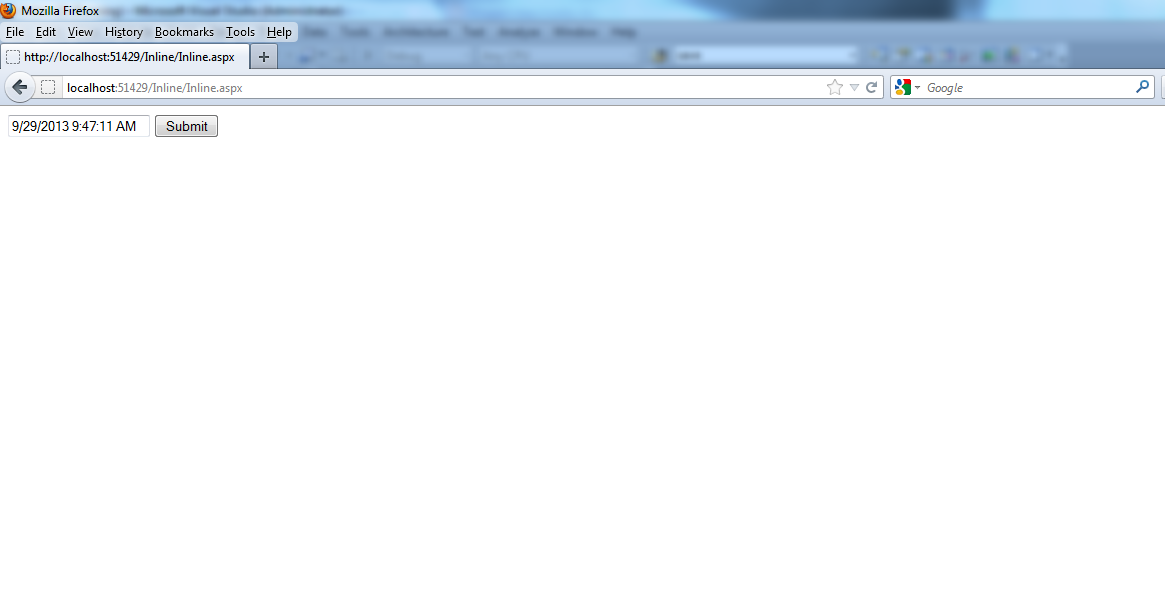
Same output will be there for both the techniques as shown in the screenshot below.


Differences among both techniques:

Code behind technique is better than inline coding technique.

Because , first it separates the code from the design, thus avoiding the confusion .
second , in case of code-behind technique, the code is written in separate file which is placed on the server in the form of compiled dlls , In the upcoming tutorials, I will also be discussing "how to host your website" , Now the dlls are faster to execute as compared to inline coding , in which the code is compiled each time when the page refreshes , because the code is there on the aspx page.

 
Happy Coding!